Expert Roof Inspection In Kansas City [2024]
“Steve, if it was not for you, I would be dealing with a major roof replacement…” – S. Garman, Merriam, KS.
Introduction: The Roof Inspection
We at Bulldog Professional Inspection Services are aware that one of the most important parts of your house is your roof. Our expert roof inspectors specializes in carefully and precisely assessing roofs. Regardless of your status as a buyer, seller, or property owner, our thorough inspections offer important information on the health, lifespan, and security of your roof. We look at a number of things, such as gutters, ventilation, leaky spots, and shingle wear. Our aim in your new home is to keep you dry and safe. For dependable, in-depth, and client-focused roof inspections in Kansas City, put your trust in Bulldog.
There are 5 major areas in every home. And no matter how big or how old the home, they’re always the same:
1. Foundation
2. Plumbing
3. Roof
4. Electrical
5. HVAC
These 5 areas are so important, they have their own Major-Items Inspection and also receive undivided attention at the end of every inspection.
In fact, out of the five major areas, roof repairs are some of the biggest deal-breakers homebuyers face when buying a new home.
And depending on type of property, 95% of all Kansas City roofs will be made from one of these materials:
- Asphalt
- Wood
- Clay/Concrete
- Slate
- Metal
- Rolled (flat roof)
The purpose of a roof inspection is to find problems and determine how much life is left.
Here you will learn how a master home inspector performs a professional roof inspection to keep you safe and dry in your new home:
OUTSIDE THE HOME:
- Limitations
- Types of shingle wear
- Areas of leakage
- Gutters and downspouts
- Roof Ridge
- Roof deck
- Ventilation
- Chimneys
INSIDE THE HOME:
- Attic rafters
- Roof deck
- Ceiling joists
- Ventilation
- Moisture stains and damage
- Ductwork and wiring
- Insulation
- Pests and rodents
- Ceiling stains and ice damming
Keep reading to learn more about a professional roof inspection.
OUTSIDE THE HOME

Just in case you’re asking yourself…
”Does this guy actually walk on the roof?”
I’ll give you the same answer I give the guy in ball pit when he asks if I go there often…yes, every chance I get.
Because the best way to check a roof is to just get up there and walk around.
This lets us feel the roof deck and get a close look at the shingles (some things you just can’t see any other way).
But there are obvious limitations:
- Wet
- Snow
- Ice
- Height
- Pitch
- Moss
- Age (old asphalt is like sand)
- Uneven ground (unstable for the ladder)
- Fragile material (we don’t walk on wood, clay, concrete, and metal)
- Blocked access (vehicles or heavy things in the way)
These will prevent us from walking on the roof.
What Happens To The Roof Inspection When It Rains?

Rain and wet roofs really put a damper on a roof inspection.
I mean, there are only 5 major areas in a home, and this is one of them. Plus, the outcome of the roof inspection may affect negotiations, final sales price, and your homeowner’s insurance.
That’s why it’s important to know your options so you can decide what’s best for you.
1) Be sure your home inspector was planning to walk on the roof in the first place.
Home inspectors are NOT required to walk on the roof, so many don’t.
2) The roof will not get walked on roof in the rain.
Aside from being slippery, there’s also the chance of being struck by lightning.
Many home inspectors have been paralyzed or killed as a result of falling off a roof (I’ve fallen off 2 myself).
3) A home inspection happens in a single visit.
To split up a home inspection between two different days will require you to pay what’s called a ‘re-inspection‘ fee for the home inspector to return and finish. This can range from a couple hundred dollars to the same price as the original inspection.
4) Reschedule the home inspection and get everything checked in one day.
Your home is a large and important investment where you and your family live. That’s why you want the roof (along with the rest of the home) done right the first time.
There are very few GOOD reasons to force a home inspection so it’s always best to just reschedule for a better day.
If you still decide to move forward it’s not all bad because the roof inspection doesn’t even start on the roof.
The Roof Inspection Starts On The Ground.
The roof inspection starts with the downspouts, gutters, fascia boards, soffits, and rake boards.
We check:
- Gutters slope toward downspouts
- Downspouts are attached to gutter
- Downspouts are right-side-up
- Downspouts are attached to home
- Elbows are installed
- Downspouts drain away from foundation
Then The Roof Inspection Goes To The Roof.
First, we check for clean gutters.
Next, we walk the roof in one of two ways (when we can): A back-and-forth pattern or an ‘M’ pattern depending on the pitch.
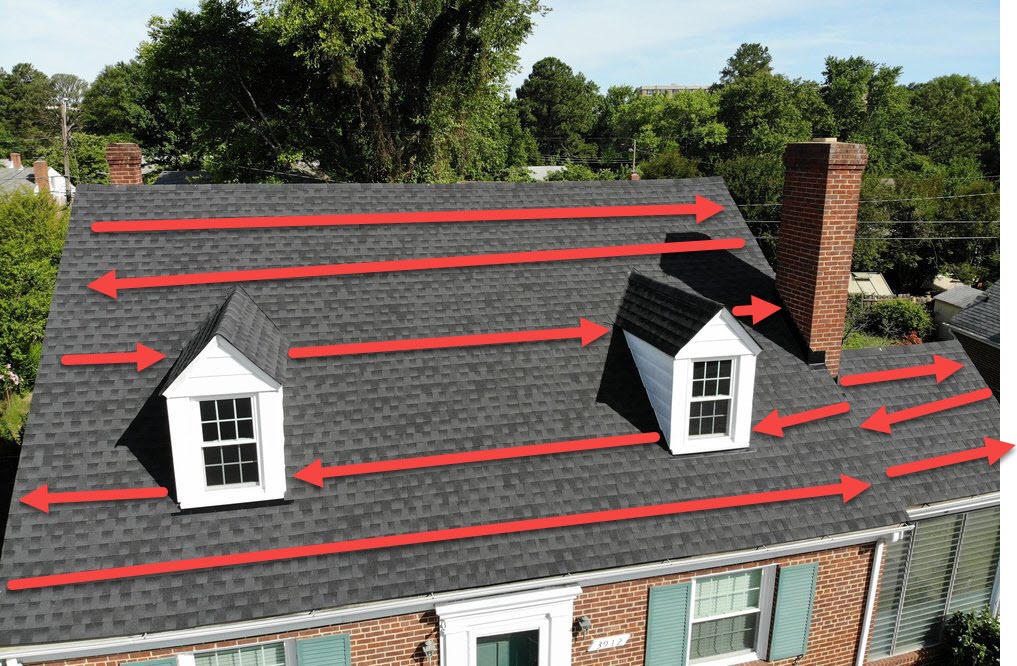
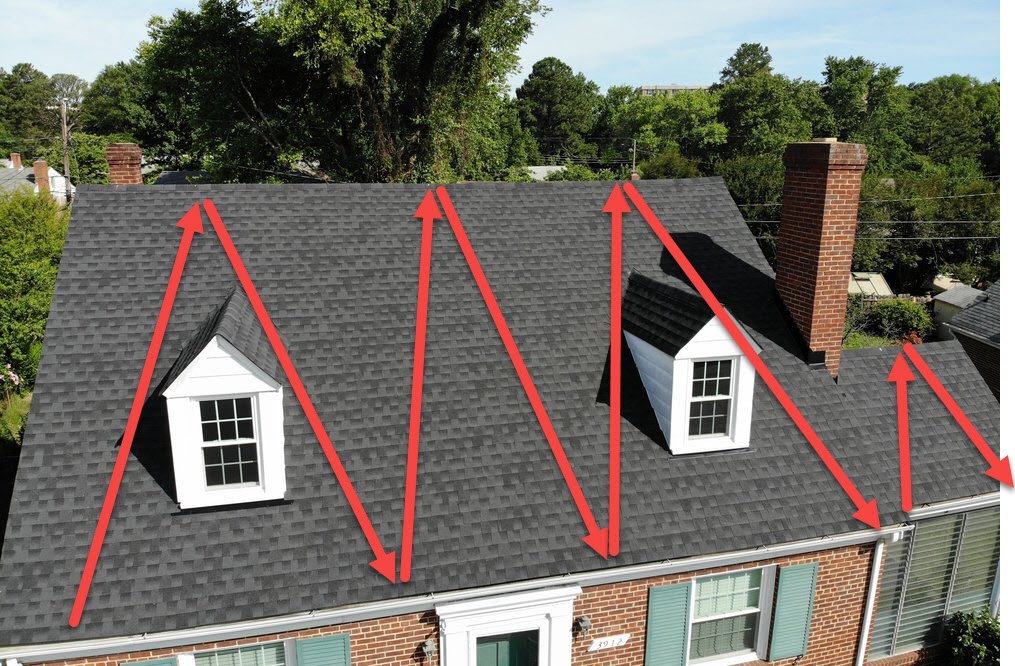
This is the best way to find soft, crunchy, wavy, uneven, buckling, and bouncy areas that show us where to pay special attention inside the attic.
The roof inspection also checks the roof shingles for:
- Curling
- Cupping
- Splitting
- Missing granules
- Tree branch damage
- Foot traffic damage
- Loose shingles
- Missing shingles
- Blistering
- Clogging
- Rot
- Cracks
- Tearing
- Breaks
- Poor craftsmanship
- Moss
- Repair Patches
- Fungus
- Wind shear
- Open seams
- Alligator cracking (yes, it’s a thing)
- Ponding (flat roofs)
- And the big daddy – hail damage
What The Hail?
Does my roof have hail damage?

Hail damage is one of the biggest threats to newer roofs.
In fact, more than 4,000 major hailstorms cause more than $1B in damage in the United States each year, there are over 100 hail reports in the Kansas City area alone, and the average hail damage roof repair is more than $4,000.
Should hail damage scare you if you’re buying a home?
No. Hail damage is covered by homeowner’s insurance so instead of the $4,000 – $32,000 you would pay out-of-pocket to replace the roof yourself, you only pay (or the seller pays if you’re buying their home) the insurance premium, which should be much less.
On the flip side, since hail damage is covered by homeowner’s insurance, it can also prevent you from getting your own homeowner’s insurance policy on that particular home until is it repaired, which can freeze your sale in its tracks.
And since you can’t buy a home with a hail damaged roof (but neither can anyone else), it actually puts you in a pretty good negotiating position.
Because it’s essentially out of your hands.
How much hail damage do you need to get a new roof?
It depends. Let’s look at it through the eyes of an insurance adjuster (the person who works for the insurance company and decides if there’s enough damage to approve your claim).
- Visual Inspection: The adjuster will inspect the roof for signs of damage. They’ll look for things like dented or cracked shingles, bruised or pitted metal roofing, or broken tiles. They’ll also examine gutters, downspouts, and vents for damage.
- Hail Impact Assessment: Adjusters may use specialized tools to measure the size and impact of the hail. They often use a hail impact scale to gauge the severity of the damage caused by different hail sizes.
- Number of Hits: Adjusters will count the number of hail hits or impacts on various parts of the roof. The more hits there are, the more likely it is that the damage is significant (usually 10 or more inside a 10 sq.ft. area gets you a new roof).
- Age and Condition: They consider the age and condition of the roof. Older roofs are more prone to damage, and the adjuster will factor this into their assessment.
- Water Damage: They also check for signs of water damage, leaks, or moisture penetration, which could indicate underlying roof damage.
- Local Building Codes: Adjusters know local building codes and regulations. If the damage violates these codes or guidelines, it may warrant a replacement.
- Extent of Damage: If the damage is extensive and compromises the roof’s integrity, they are more likely to recommend a replacement.
- Insurance Policy Terms: The adjuster will also review your insurance policy to determine coverage and the deductible amount.
If you have a storm then start seeing roofing trucks driving around your neighborhood, that’s a telltale sign to call your homeowner’s insurance company and have them do a roof inspection on your home.
What does hail damage look like?
Asphalt
Asphalt shingles will look like you’ve been throwing golf balls at it.

Clay or Concrete
Clay or concrete roofs will have cracked and broken shingles.

Metal
Metal roofs will be dented.

Wood
Wood shake and shingle roofs will be cracked, broken, and gouged.

Slate
Hail damage on slate roofs can look like cigarette burns.

Flat
Flat roof will look like you’ve been skipping rocks.

Your roof might NOT be the only area replaceable by hail damage.
These areas may also be covered by your homeowner’s insurance hail coverage policy:
- Siding
- Windows
- Gutters
- Downspouts
- Fences
- Light fixtures
- Vents
- AC unit
- Deck
- Skylights (and things that get damaged because of it)
- Garage
- Shed
- Workshop
These are just possibilities. Every policy is different, so you’ll want to check yours to understand the what’s covered. Keeping detailed photos and records of the damage will also help speed along the claims process.
We also check common points of leakage:
- Flashings
- Plumbing
- Drip edge
- Roof vents
- Service mast
- Combustion
- Cricket
- Valley
- Kickout
- Counter
- Step
- Rubber boots
- Direction changes
- Base of walls
- Base of chimneys
- Base of skylights
- Penetrations
- Skylight
- Chimney
- Plumbing vent
- Combustion vent
- Popping nails
- Popping staples
- Anything that attaches to the roof
- Anything that comes within 6 feet of the roof
The roof inspection also checks the remaining areas:
- Gable vents
- Chimneys
- Height
- Bricks and mortar
- Cracking
- Crown
- Flues
- Caps
- Skylights
- Tree branches
- Electrical service mast
- Roof ridge
- Roof deck
- Wavy
- Crunchy
- Soft
- Bouncy
- Buckled
- Ventilation
- Not enough
- Too much
- Blocked
- Damaged
Multiple Shingle Layers
Several Sheet Shellshock
Your attic isn’t just a space for insulation. It’s a key part of your home’s building envelope.
And the same way changing a game’s players, changes the game; changing your roof structure, changes the envelope.
So, multiple layers of roof shingles don’t just interfere with the building envelope and how well it manages all the air, heat, and moisture inside in your home:
1. It’s Heavy
The average size of a Kansas City area roof is 1,700 sq.ft.
The average weight (lbs./sq.ft.) of roof shingles:
- Asphalt Shingle
- Textured Asphalt Shingle
- Wood Shingles/Shakes
- Clay or Concrete Tile
- 2 – 3.5
- 3.5 – 5
- 3.5 – 4.5
- 5.5 – 10
That means the weight of 1 layer of shingles for the average roof:
- Asphalt Shingle
- Textured Asphalt Shingle
- Wood Shingles/Shakes
- Clay or Concrete Tile
- 3,400 – 5,950 lbs.
- 5,950 – 8,500 lbs.
- 5,950 – 7,650 lbs.
- 9,350 – 17,000 lbs.
Multiple layers only occur with wood shingles and asphalt shingles, so, 2 layers:
- Asphalt Shingle
- Textured Asphalt Shingle
- Wood Shingles/Shakes
- Asphalt/wood mix-n-match:
- 6,800 – 11,960 lbs.
- 11,960 – 17,000 lbs.
- 11,960 – 15,300 lbs.
- 9,350 – 16,150 lbs.
This is between 3.4 tons and 8.5 tons for 2 layers of shingles weighing down a home’s roof structure, which is allowed in nearly all areas of Kansas City.
I’ve personally seen 6 layers of asphalt shingle on a roof.
So, what kind of damage can multiple shingle layers cause to your home?
If you have a storm then start seeing roofing trucks driving around your neighborhood, that’s a telltale sign to call your homeowner’s insurance company and have yours checked out.
1. Broken Roof Rafters

2. Sagging Ridge Beam

3. Broken Collar Ties

What does hail damage look like?
Asphalt
Hail damage on asphalt shingles looks like they’ve been hit with golf balls.
Clay or Concrete
Clay or concrete roofs will have cracked and broken shingles.
Metal
Metal roofs will be dented.
Wood
Wood shake and shingle roofs will be cracked, broken, and gouged.
Slate
Hail damage on slate roofs can look like cigarette burns.
Flat
Flat roof will look like you’ve been skipping rocks.
2. It Traps Water
Multiple layers traps water between the shingles, holds moisture, and damages the areas nearby.
If the first layer has moss and algae (dark streaks on the shingles) and holding moisture, a second layer will smother it. This will make it worse and damages areas nearby.
Moss / Algae

Warping roof deck

3. It Can Cost More Later
Delaying the replacement of your shingles by adding layers may cost less today, but the consequences may cost more later because it creates issues that can’t be ignored:
- Finding damage to roof structure
- Fixing damage to roof structure
- Moisture damage from trapped water
- warped boards
- buckling deck
- missing ‘H’ clips
- Multiple layers cost more to replace
- takes longer to remove
- more trash to dispose
- damage caused by added weight, heat, and moisture
- now you may have to replace roof deck, too
- It can shorten shingle life
- because of trapped heat
- breaks down shingles
- can cause leaks
- It’s ugly
- can create wavy shingles
- affect market value
INSIDE THE HOME

The Roof Inspection Continues Inside The Home.
Next, we immediately go into the attic to determine if any wear, tear, and damage outside can be seen inside.
Inside the attic we check:
- Roof rafters
- Roof deck
- Ridge beam
- Collar ties
- Strongback support
- Ceiling joists
- Electrical wiring
- HVAC ductwork
- Plumbing
- Furnace vent
- Water heater vent
- Ventilation
- Moisture stains
- Moisture
- Mold
- Pests, insects, and rodents
- Insulation
- Soffit baffles
- Party walls (duplexes and townhomes)
After the attic, we keep looking for signs of past trouble on the walls and ceilings throughout the home.


